
Open Home Preparation in New Zealand: Complete NZ Specific Checklist
TL;DR (key facts with official NZ sources)
- Start with low-cost wins first: declutter, deep clean, small repairs, and street appeal usually beat last-minute big renos. See Preparing your property for sale.
- Prep for what buyers actually check: water pressure, windows/doors, storage, smells/moisture, light, and parking. Use the official Open home checklist (PDF).
- Make comfort obvious: warm, dry, well-ventilated rooms signal quality. Skim the Healthy Homes Standards overview and the Ventilation standard.
- Plan the sale method early — auction, deadline, negotiation or advertised price; your method shapes timing and how you run opens.
- Timebox the event — 20–45 minutes is typical; pair one good weekend slot with private viewings.
Tips: If you’re still touring the market (searching open homes near me, open homes today), use the same checklist to stage your own open home so it feels bright, warm and move-in ready.
Week-Before vs Day-Of: Your Simple Sequence
The week before your open home
- Declutter & depersonalise: clear surfaces, thin out cupboards/wardrobes so storage looks generous (aim for ~25–30% free space).
- Deep clean: kitchen/bathrooms, windows (inside & out), mirrors, skirting, light switches, rangehood filters.
- Quick fixes: replace blown bulbs, quiet squeaks, adjust doors, touch up scuffs, fix drips, re-silicone if needed.
- Exterior spruce: mow/edge lawns, sweep paths/decks, wipe the front door, refresh letterbox/house numbers.
- Smell & moisture control: air out daily; use dehumidifier if needed; avoid heavy fragrances.
- Safety & privacy: plan where pets, medications, mail and valuables will go during the open home.
- Proof points: gather simple one-pagers—recent maintenance, upgrades, appliance manuals—to leave on the dining table.
Before you spend on prep, sense-check your likely sale range: get a free house valuation in NZ so your budget matches the expected outcome.
The morning of the open home
- Air, then warm: ventilate for 10 minutes, then close up and set the heating to a comfortable level.
- Light and consistency: open blinds/curtains evenly; switch on all lights (including lamps and entry lighting).
- Final tidy: quick kitchen/bath wipe-down; bins out of sight; hide pet items; fresh towels/linen.
- Scent discipline: keep it subtle (fresh air beats strong fragrances).
- Visitor flow: prop internal doors to create an easy loop; remove trip hazards and excess furniture.
- Kerb appeal check: driveway clear, path swept, house number visible.
- Information table: features sheet, recent maintenance notes, and next viewing options—neatly laid out.
First Impressions: Exterior & Entry (Kerb Appeal)
A tidy, welcoming approach sets buyer expectations before they touch the front door. Aim for “clean, simple, looked-after” not over-styled. Sweep paths and steps, shake mats, clear cobwebs and wipe the front door and handle. Make sure house numbers are visible from the street and replace any blown porch bulbs. Trim edges, deadhead flowers and tidy one simple planter near the entry. Relocate bins, hoses and tools. Leave the driveway and closest park free so people searching “open homes today near me” can arrive easily if they’re touring multiple properties.
Small upgrades with big impact include a fresh neutral doormat, tightened or replaced entry hardware, and oiled gate hinges. If it’s wet or windy, put mats inside and out, add a simple umbrella stand and do quick wipe-downs between groups.
Inside: Clean, Fix, Style (Without Overspend)
Make every room feel bright, clean, and move-in-ready. In the kitchen, clear benches and polish tapware; in bathrooms, make glass and silicone spotless. Across the home, clean windows, skirting and switches; replace mismatched bulbs; touch up high-traffic scuffs; quiet squeaks and fix dripping taps. Keep surfaces mostly clear and use neutral textiles to signal freshness. Aim for 25–30% empty storage so cupboards read spacious, and balance lighting with both overheads and lamps.
Want room-by-room styling priorities that suit NZ homes? See our guide: Staging a Home for Sale in New Zealand: A Complete 2025 Guide.
Light, Warmth & Air: “Healthy Homes” Cues Buyers Feel
Comfort is the first thing buyers register. Air the house briefly, then close windows and bring rooms to a steady, comfortable temperature so the warmth is obvious when the door opens. Show that ventilation works: run the bathroom extractor, keep the kitchen rangehood ready if you’ve cooked, and wipe any condensation from sills. In coastal suburbs, rinse the exterior glass with a salt film the day before; in humid conditions, run a dehumidifier earlier in the morning.
These cues align with the Healthy Homes pillars of heating, ventilation and moisture control. Learn the essentials in the Healthy Homes Standards Overview, the Ventilation Standard, and the detailed Ventilation PDF. Keep the air neutral (no heavy scents) and the light balanced by opening blinds evenly and turning on lamps so rooms feel bigger and better cared for.
Note: Healthy Homes standards apply to rental properties; if you’re selling your own home, use them as best-practice comfort benchmarks rather than legal requirements
What Buyers Actually Test (So You Can Fix It First)
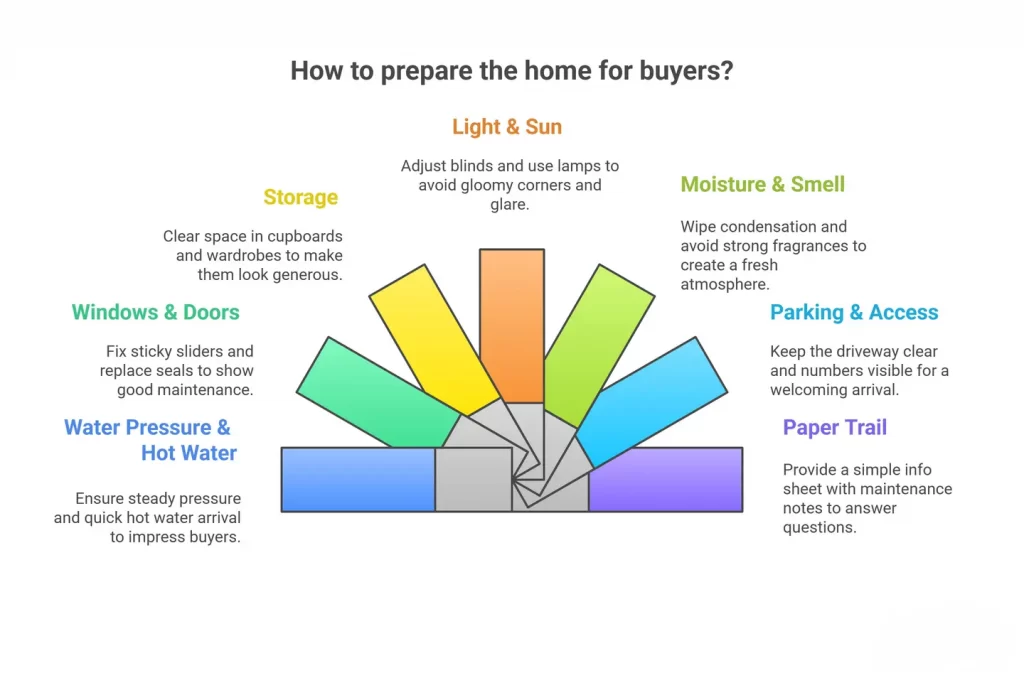
Water pressure & hot water: viewers will turn on taps. Make sure pressure is steady and heat arrives quickly.
Windows & doors: sticky sliders, rattly latches or perished seals suggest deferred maintenance; lubricate tracks, tighten screws and replace the worst seals.
Storage: buyers peek in cupboards and wardrobes. Clear space so they look generous and easy to use.
Light & sun: avoid gloomy corners and glare; set blinds to even heights and use lamps as needed.
Moisture & smell: wipe condensation, empty bins, and avoid strong fragrances that feel like cover-ups.
Parking & access: arrival sets the tone — keep the driveway clear and numbers visible.
Paper trail: a simple info sheet with recent maintenance and upgrade notes answers half their questions.
Day-of Open-Home Run-Sheet (Simple, Printable)
90 minutes before — Sweep the exterior; hide bins/hoses; clear the driveway; make beds; tidy benches; put fresh towels out; pack away pet items.
45 minutes before — Air for 10 minutes, then heat (or pre-cool sun-exposed rooms); open blinds evenly; switch on all lights and a couple of lamps; wipe kitchen/bath touch points.
15 minutes before — Soft background music; valuables and medications stowed; internal doors propped to guide an easy loop; info sheet on the dining table.
During — Greet at the door, let visitors walk the loop and stay available for questions; do quick entry wipe-downs between groups in wet weather.
After — Note recurring questions/objections, then reset quickly for private viewings.
Running your own campaign end-to-end? See Sell Your House Privately in NZ (2025): A Complete Step-by-Step Guide.
Scheduling Strategy (Turnout and Urgency)
One strong weekend slot usually beats two scattered times. Aim between 10:00 and 16:00 so natural light does the heavy lifting; go slightly later in winter for warmth and earlier in high summer to avoid glare.
Keep the window short — about 20–30 minutes — then funnel serious interest into private viewings. This concentrates visitors, signals demand and gives you breathing space to reset. Check nearby fixtures; sports days or local events can pull your audience, so choose a start that doesn’t clash.
If you’re still touring open homes near me or scanning open homes today, notice when crowds peak in your area and mirror that pattern for your own open home. Not sure which slot fits the buyer flow in your suburb? Find your top local agent for a quick, suburb-specific recommendation, then lock your open into the time buyers are already showing up.
Budget Guide (NZD Tiers)
$0–$200 (quick wins). Replace blown bulbs, refresh a tired doormat, do a deep clean, tidy the gutters by the entry, and use a small tube of silicone to tidy the bathroom/kitchen edges.
$200–$800 (professional polish). Book a cleaner for kitchens, bathrooms and windows; water-blast paths/decks if needed; add mulch/topsoil for sharp garden edges; do small paint touch-ups in high-traffic areas.
$800–$2,000+ (targeted refresh). Refresh lighting in dark rooms, repaint scuffed walls or the front door and do a selective landscaping tidy that frames the entry. Keep scope tight and visible — focus on what buyers will experience in a 20–30 minute open home.
If you’re unsure where to stop, start with the number: get a free house valuation in NZ and scale prep to the likely sale range.
Seasonal & Regional Tweaks (Auckland, Wellington, Christchurch)
Open homes Auckland. Plan around traffic and parking so arrivals feel smooth. In coastal suburbs, rinse salt film from exterior glass the day before — clear windows lift both photos and first impressions. Auckland’s winter sun sits lower; a late-morning or early-afternoon slot usually flatters living spaces. On windy or wet days, set double mats (porch and entry) and keep a towel handy for quick door-handle wipe-downs.
Open homes Wellington. Northerlies and sideways rain can turn an entry messy fast. Create a sheltered drop zone: an umbrella stand, sturdy mats inside and out, and a simple pause point so water doesn’t trail through. Pre-heat earlier than you think; a calm, warm interior contrasts beautifully with the weather and proves ventilation works without noise.
Open homes Christchurch. Nor’westers bring bright, dry air but also glare. Set blinds to even heights to soften hot light and balance rooms for photography and walkthroughs. Many newer builds are snug; they quietly demonstrate extraction in kitchens and bathrooms so the home feels fresh, not sealed. In established suburbs, touch up the window putty or paint where the sun has weathered edges.
“Near me” nuance. If buyers are still searching open homes near me or open homes today near me, they’re likely cross-comparing several properties in one loop. Keep your event short, start on time and make arrival easy with clear signage and a visible house number. That way your open home feels organised, confident and easy to love — no matter the city or season.
Finding Open Homes Near You (and Using That Insight)
Use your preferred portal’s map view and filters to surface open homes near me and open homes today. For a tight schedule, switch to open homes today near me, pick two or three in the same area and walk them back-to-back. Notice what draws crowds: warm entry, even lighting, neutral air and tidy storage. Those same cues become your checklist for presenting your own open home.
As you compare properties, pay attention to timing and turnout. If a 12:30 slot in your suburb looks busy, mirror that pattern for your weekend campaign. When you’re ready to pivot from visiting to listing, get local, practical advice. Before you lock dates, sanity-check price expectations so you don’t over- or under-prepare: a quick Free Market property Report gives you a snapshot of nearby sales and demand.
Photography & Listing Consistency
Shoot the home the way buyers will experience it on open homes today — same lighting, layout and styling. If you plan to pre-heat or pre-cool before viewings, do the same before photos so the glass stays clear and the rooms feel comfortable.
Open blinds to a consistent height, hide bins and pet items and keep benchtops mostly clear with one simple vignette per room. Pull furniture off walls to create walkways, straighten dining chairs and align towels and bedding so lines are clean. If a room is small, remove one item rather than forcing everything to fit.
Carry the same look into your listing copy. Mention practical, testable things buyers notice in person — recent maintenance, good water pressure, effective ventilation, sun aspect and parking ease — so expectations match reality. Publish your open home time early and keep it updated; if weather or life happens, change the time promptly on your listing and socials. For a pricing sense-check that keeps the story tight, try a Free Market property Report before you go live.
FAQs (quick answers you can copy into your listing page)
Q: Where can I find open homes near me or open homes today?
A: Use your preferred property portal’s map view and filter for open homes today to build a same-day tour. Time your own open home to mirror busy local slots.
Q: How long should an open home run?
A: Twenty to thirty minutes is usually enough to create energy without crowding. Keep it warm, bright and well-ventilated, then funnel serious interest into private viewings.
Q: Do I need to be there during the open?
A: It’s better to step out. Buyers relax, give candid feedback and stay longer when the owner isn’t present. Your agent or host can gather unfiltered insights and manage questions.
Q: What do buyers actually test?
A: Water pressure and hot water, windows and doors, storage, light and ventilation and how the home smells. Fix quick wins first and set the temperature before the door opens.
Conclution
You don’t need a big spend to make a strong first impression — just a warm, dry, well-lit home that feels easy to live in, plus a short, well-timed viewing. Sense-check budget against your likely range, then focus on the quick wins that buyers actually test. If you want suburb-specific timing or help coordinating viewings after your main slot, find your top local agent for an informed plan. And if you’re still weighing up the numbers before you commit to prep, start with a free house valuation in NZ so every dollar works hard for your sale.

